The Best Way to use DocuSign with Appian
So you have a new requirement and need to set up a DocuSign flow in your Appian application. You want to make sure you set it up to handle your current use case while ensuring future enhancements are implemented as painlessly as possible. We’ll walk you through how to implement a basic use case - a single signer on an envelope containing a single document that’s only used in one Appian application - but we’ll do it in way that:
- uses Appian’s out-of-the-box DocuSign Connected System,
- routes responses to our specific Appian application,
- uses OAuth 2.0 to authenticate with Appian, and
- stores our forms to be signed as templates in DocuSign.
Prerequisites
To follow along with the rest of the guide, you’ll need to have:
- an Appian environment with a System Administrator user (the environment we’ll be using in this tutorial is on version 22.4), and
- a DocuSign account (you can get a free developer account here).
Creating an Appian OAuth 2.0 Client
While logged in with your Appian System Administrator user, navigate to the Web API Authentication section of the Administration Console.
- Click the
OAuth 2.0 Clientstab - Click
Create - Add an appropriate description (something like DocuSign Connect) and a new service account (something like
docusign) - Click
Create - Copy and securely store the
Client ID,Client Secret, andToken Request Endpointthat are presented - Click
OK
Setting Up DocuSign
Connect
Make sure that you do these steps on the same account you’re going to use for your eventual production DocuSign environment. Due to DocuSign’s Go-Live requirements, you’ll want to be able to promote the app you’re building here.
To set up Connect, follow the steps below.
- Navigate to Connect OAuth 2.0 in Settings. You should see the following input fields on your screen.
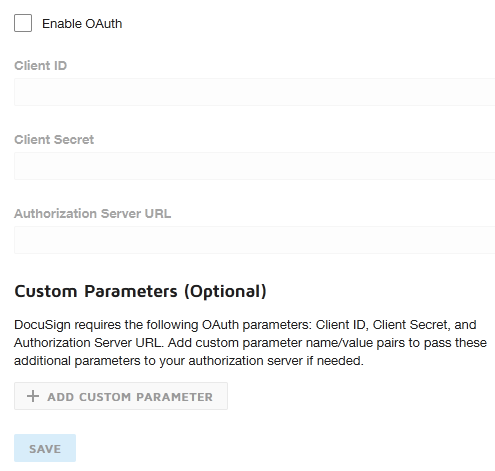
- Check the
Enable OAuthcheckbox - With the details you securely stored while creating your Appian OAuth Client, fill the
Client ID,Client Secret, andAuthorization Server URL. TheAuthorization Server URLwill be theToken Request Endpoint. - No Custom Parameters are needed, so click
SAVE
Apps and Keys
Although we are using JWT, we still need to set up an application to get the Integration Key and RSA Private Key for our Connected System.
- Navigate to Apps and Keys in Settings
- Note and securely store your
API Account IDandAccount Base URI - Click
ADD APP AND INTEGRATION KEY - Enter an App Name (e.g., Appian)
- Copy and securely store your
Integration Key - Leave Authentication as
Authorization Code Grant, as we will using a third option not listed (JWT Grant) - Click
GENERATE RSAand securely store the Private Key - Click
ADD URIunder Redirect URIs - Add a safe domain that we will use when authorizing our Connected System. Feel free to use https://www.taberna.tech. We won’t need a live callback endpoint due to the authorization type we’re implementing.
- Click
SAVE
Users
Now we are going to add a new user to our DocuSign account that will serve as our application user.
- Navigate to Users
- Click
ADD USER - Add an email address. Note that this must be unique from the email of other DocuSign users on your account.
- Click
NEXT - Add a Full Name (e.g., Appian Application)
- Click
NEXT - Enter an access code and securely store it
- Click
NEXT - Select Permission Profile of DS Admin. DS Sender is likely fine as well, but we have not tested this.
- Click
ADD USER - The user you have added will receive an email from DocuSign. They will need to login and provide the access code you entered to be added to the application.
- After the user is setup, navigate to their user in Users.
- Copy and securely store the
User ID
Creating a DocuSign Template
DocuSign templates are a way we can send documents to be signed and only change the recipient-specific information. We’ll set up a sample document for use in the rest of the flow below. Grab any sample PDF with a name field and signature field that you can find.
- Navigate to the DocuSign Templates section.
- Click
NEWthenCreate Template - Add a Template name and Template description
- Upload your document to be signed
- Under Add recipients, add
signerunder Role, leaving everything else the same - Click
NEXTat the bottom - Select Delete data if DocuSign finds PDF form field data in your uploaded document. Click
CONFIRM. - In the Standard Fields selection on the left, select Signature and drag it to the place where you want the signature to appear on your document
- With the signature field selected, ensure
Required Fieldis checked on the right side - In the Standard Fields selection on the left, select Name and drag it to the place where you want the signer’s name to appear on your document
- Click
SAVE AND CLOSE - Click the name of your template in the list of templates that appear
- Click the
Template IDfield below to display the Template ID. Copy and store it securely.
Creating a DocuSign Appian Application
Depending on your license, as well as your current platform architecture, you will likely want to create a new Appian application to hold all of your DocuSign objects. This approach has a few benefits, namely
- logical separation of a platform-level implementation from application-level code, and
- easier deployments as we will only be dealing with objects that directly relate to the DocuSign implementation.
If we take this approach it is important to ensure the security groups are setup such that your users are able to consume all of the objects we’re going to create with the correct permissions.
Design Approach
We are looking to accomplish a few goals with our implementation.
- Create a generic application that can be consumed by any of our applications that require a document signing flow.
- Keep our process models short-lived (for performance)
- Segment our processes by events (e.g., one process model for user declines to sign, and one process for user signs successfully) instead of adding all of the events to one catch-all model. This helps with maintainability and system performance.
Keeping these goals in mind, let’s walk through the application and objects we’ll create in our DocuSign application.
DocuSign Application
Click
New Applicationin Appian Designer.
Fill in your application details and make sure to check
Generate groups and folders to secure and organize objects.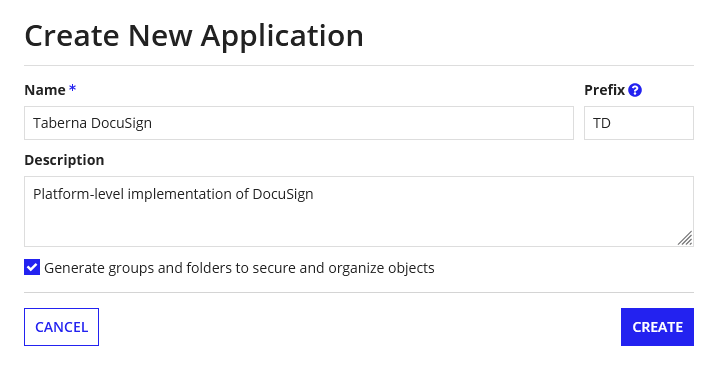
You should now have your fresh application scaffolded for you and we can begin fleshing it out.
Groups
When we created our application, Appian created us our Administrators and Users groups. The only other group we should add is an Alerts group to which we will send all of our process alerts.
- Create a new group called Alerts. We’ll make our Users group the parent, but the rest of the information can be left as default.
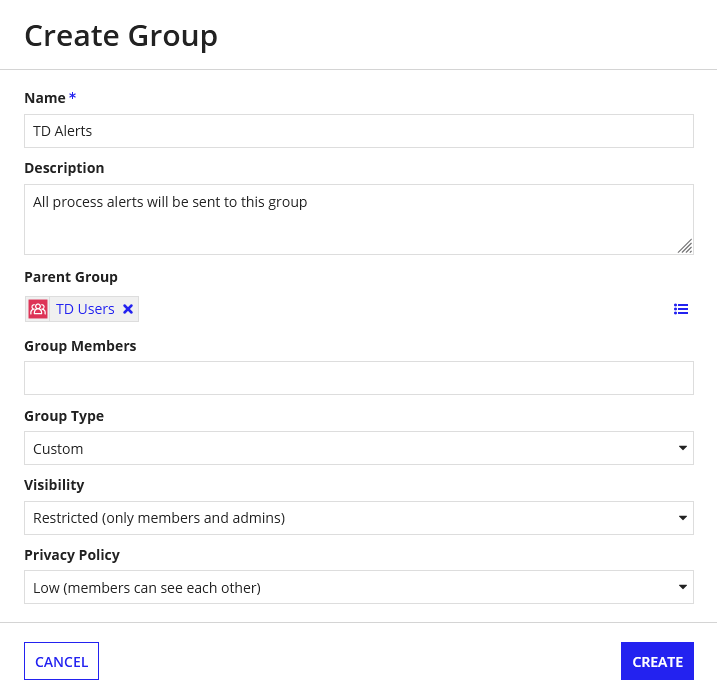
CDTs
Our approach here is to map the DocuSign objects that we will be using (all of which are nicely laid out in DocuSign’s REST API Reference). We will not be adding them to a Data Store, as we don’t plan on writing any of them to the database. Create each of the CDTs outlined below in the order presented, ensuring all of the CDTs are in your DocuSign application namespace.
Connect Event Data
Connect Event Data will allow us to specify what information DocuSign will send back to Appian when Envelope and Signer events occur.
TD_connectEventData
| Name | Type | Length | Array | Key | Description |
|---|---|---|---|---|---|
version | Text | 8 | - | - | Must be set to restv2.1 to return data in JSON |
Event Notification
The Event Notification object allows a message to be sent a specified URL when the envelope or recipient changes status.
TD_eventNotification
| Name | Type | Length | Array | Key | Description |
|---|---|---|---|---|---|
deliveryMode | Text | 3 | - | - | Setting this to SIM enables the DocuSign JSON SIM format for envelope-level configurations. See this page for an explanation. |
eventData | TD_connectEventData | - | - | F | The Connect Event Data we defined above |
events | Text | 30 | ☑ | - | A comma-separated list of envelope-level event statuses that will trigger Connect to send updates to the endpoint specified in the urlToPublishTo property. The full list is available in the documentation. |
includeOAuth | Boolean | - | - | - | Instructs DocuSign to use OAuth authentication when calling Appian |
loggingEnabled | Boolean | - | - | - | When true, the webhook messages are logged. They can be viewed on the DocuSign Administration Web Tool in the Connect section. |
url | Text | 255 | - | - | The endpoint to which webhook notification messages are sent via an HTTPS POST request. The URL must start with https. This will be the address of the Web API we create to receive DocuSign events in Appian. |
Template Role
This object allows us to specify a recipient of the documents (in our case we’re using templates) we will be sending via DocuSign.
TD_templateRole
| Name | Type | Length | Array | Key | Description |
|---|---|---|---|---|---|
email | Text | 255 | - | - | The email address of the person associated with a role name. It is the email address of the person specified in the name property. |
name | Text | 255 | - | - | Specifies the recipient’s name |
roleName | Text | 255 | - | - | Specifies the role name associated with the recipient |
routingOrder | Number (Integer) | - | - | - | Specifies the routing order of the recipient in the envelope |
Envelope
Envelopes are the containers for DocuSign transactions. They contain:
- One or more documents that will be signed electronically
- Information about the sender
- Information about the recipients, including all other objects (such as tabs) that are associated with those recipients
- Status information that tracks delivery and signature progress
TD_envelope
| Name | Type | Length | Array | Key | Description |
|---|---|---|---|---|---|
emailSubject | Text | 100 | - | - | The subject line of the email message that is sent to all recipients. |
eventNotification | TD_eventNotification | - | - | F | The eventNotification object that controls our webhooks |
status | Text | 9 | - | - | Indicates the envelope status. Valid values when creating an envelope are: created and sent. |
templateId | Text | 100 | - | - | The ID of the template we created. |
templateRoles | TD_templateRole | - | ☑ | F | The templateRoles object that controls the recipients of our envelope. |
Connected System
We will now create our connection to DocuSign. Ensure you have followed the steps in DocuSign Apps and Keys above, as we will be using a number of parameters from that step here.
- Create a new Connected System in your Appian application. We’ll call ours
TD DocuSign. - Select
JWT Grantas the Authentication - Add the
API Account IDvalue from your DocuSign Apps and Keys - Under
API Username, you will need to add theUser IDfrom your DocuSign user. This can be found in the specific user you added in Users. - Ensure the only DocuSign account you are actively logged in with is the same account as the
User IDyou are using. - Enter the Integration Key from your DocuSign Apps and Keys
- Add the Private RSA Key that you stored from your your DocuSign Apps and Keys
- Navigate to the following URL, ensuring you replace
YOUR_INTEGRATION_KEYwith the Integration Key you entered above.
If you have done it correctly, you should see the image below.https://account-d.docusign.com/oauth/auth? response_type=code &scope=impersonation signature &client_id=YOUR_INTEGRATION_KEY &redirect_uri=https://www.taberna.tech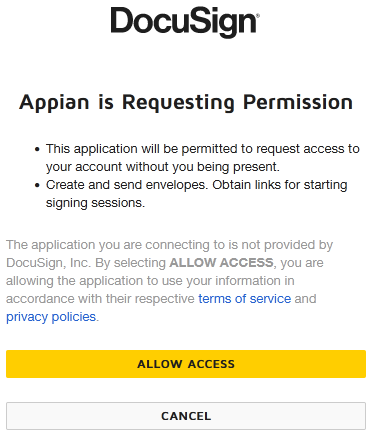 When you deploy your application to production, you will need to do this step again, replacing
 account-dwithaccount. - Select Development as the DocuSign Environment
- Click
TEST CONNECTION. You should see Connection successful (as in the image below).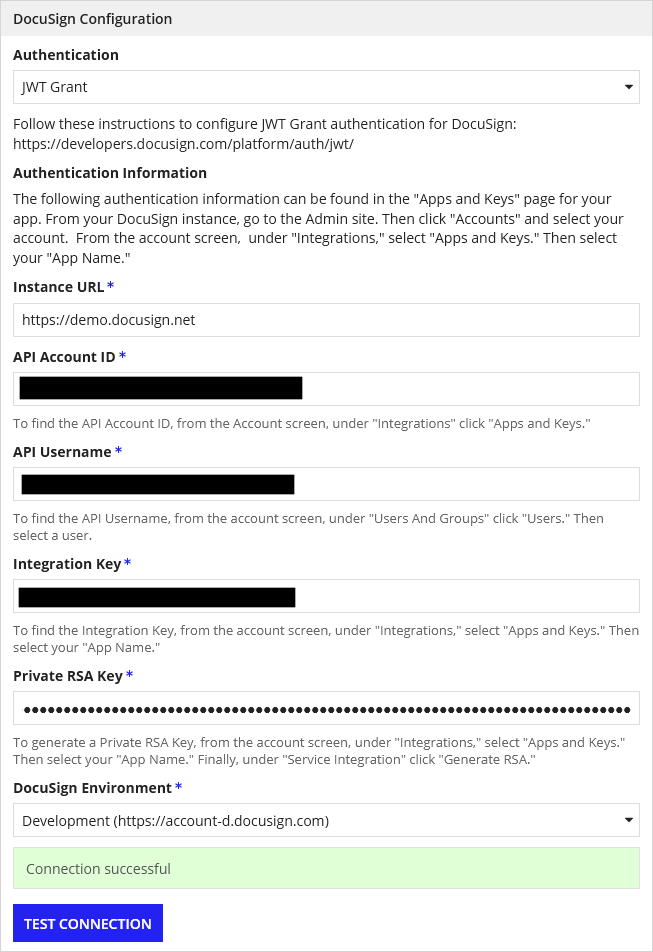
- Click
CREATE - Click
SAVEafter reviewing the security (the default should be fine)
Expression Rules
The following expression rule will allow for repeatable construction of your DocuSign envelopes, abstracting as much boilerplate code as possible.
DocuSign Envelope Constructor
This will be used every time we want to create a new DocuSign Envelope.
Create a new Expression Rule, adding an appropriate name (e.g.,
TD_ConstructDocuSignEnvelope) and descriptionAdd the following rule inputs
Name Description Type Array emailSubjectThe subject of the email that DocuSign will send to your signers Text - eventNotificationUrlThe Web API URL that will receive your DocuSign events Text - templateIdThe ID of the DocuSign template that will be signed Text - templateRoleListA list of the Template Roles for the envelope TD_templateRole☑ Add the following expression definition (names assume you followed the naming convention we have used here)
'type!{urn:com:appian:types:TD}TD_envelope'(
   emailSubject: ri!emailSubject,
   eventNotification: 'type!{urn:com:appian:types:TD}TD_eventNotification'(
      deliveryMode: "SIM",
      eventData: 'type!{urn:com:appian:types:TD}TD_connectEventData'(version: "restv2.1"),
      events: "envelope-completed",
      includeOAuth: true,
      loggingEnabled: true,
      url: ri!eventNotificationUrl
   ),
   status: "sent",
   templateId: ri!templateId,
   templateRoles: ri!templateRoleList
)
Ensure you add some test cases!
Integrations
We’ll now setup two integrations - one to create and send a document to a signer, and one to download a document (in our case it will be the signed document).
Create and Send Envelope
Create a new Integration using the
TD DocuSignConnected System we createdGive the integration an appropriate name (e.g.,
TD_createAndSendEnvelope)Add a description
Click
CREATE. The new integration should open.Add the following rule inputs (they’re the exact same as in our envelope constructor)
Name Description Type Array emailSubjectThe subject of the email that DocuSign will send to your signers Text - eventNotificationUrlThe Web API URL that will receive your DocuSign events Text - templateIdThe ID of the DocuSign template that will be signed Text - templateRoleListA list of the Template Roles for the envelope TD_templateRole☑ Enter the following code as the Envelope Definition
a!toJson(
   rule!TD_ConstructDocuSignEnvelope(
      emailSubject: ri!emailSubject,
      eventNotificationUrl: ri!eventNotificationUrl,
      templateId: ri!templateId,
      templateRoleList: ri!templateRoleList
   )
)
Check
Would you like to send the envelope to the signers?Leave the Document untouched, as we’re using Template instead of composing documents in Appian
Download Document from an Envelope
Create a new Integration using the
TD DocuSignConnected System we createdGive the integration an appropriate name (e.g.,
TD_downloadDocumentFromEnvelope)Add a description
Click
CREATE. The new integration should open.Add the following rule inputs
Name Description Type Array envelopeIdDocuSign envelope ID Text - documentIdThe ID of the DocuSign document to download Text - folderThe folder in which documents will be saved Folder - Set Envelope ID equal to
ri!envelopeIdSet Document ID equal to
ri!documentIdSet Save Document In equal to
ri!folder
Creating DocuSign Envelopes in Appian
In this section we’ll walk through creating an application through which we will send and receive DocuSign envelopes.
Consumer Application
We’re going to create a new application as part of the guide in which we’ll consume our DocuSign application objects in order to send and receive envelopes. You may already have an application in which you wish to do this, so a brand new application isn’t strictly necessary for this part.
If you’re going to set up a new application, you can follow the same steps outlined in the DocuSign Application we added above. The one we have created for our demonstration here is called Taberna Signature (TS) so you’ll see the TS prefix throughout the remainder of the guide.
Folders
We need a folder to store documents that have been successfully completed in DocuSign.
- Create a Document Folder, providing an appropriate Name and Description
- Create a constant pointing to your new folder. This is also outlined in Constants
Groups
In order for DocuSign to call us, the DocuSign service account must be added to our application users as well as be an editor on the Knowledge Center to which our Downloaded Documents Folder belongs.
- Create a Knowledge Center Editors group as a child of your Users group. The default settings are fine.
- Add the DocuSign service account that was created during the OAuth 2.0 Client setup to the Knowledge Center Editors group.
- Add an Editor permission on your Knowledge Center for the new Knowledge Center Editors group.
Process Models
We are going to build 2 process models. One will create and send a document for us and the other will handle envelope completion events from DocuSign.
Create and Send Document
In this process model we will construct a new envelope and send it to DocuSign for signature. For the purpose of the demo, we will be hardcoding the recipient data in a script node, but by providing recipient data into the process model via an interface or separate process, you can extend this process to make it fit in your application with only minor changes. In our implementation, it would be best not to have a script node and just implement the hard-coded role in the input field of the integration node, but by doing it this way, we allow for easy replacement in your implementation.
- Create a new process model, providing an appropriate name and description.
- Adjust your alert settings to notify the proper user group(s)
- Create a new process variable called
templateRoleof typeTD_templateRole - Create a script node in which you output the following values to your
templateRolevariable.cons!TS_TEXT_DOCUSIGN_ROLE_SIGNERis defined below.'type!{urn:com:appian:types:TD}TD_templateRoles'( email: <YOUR EMAIL>, name: <YOUR NAME>, roleName: cons!TS_TEXT_DOCUSIGN_ROLE_SIGNER, routingOrder: 1 ) - Create a Call Integration node pointing to
TD_createAndSendEnvelope, ensuring a 1:1 mapping of the integration rule inputs in the input fields of the Data tab.- Set the subject to any text you’d like
- Set the
eventNotificationUrlto equalcons!TS_TEXT_DOCUSIGN_EVENT_ENDPOINT. This is outlined inConstantsandWeb API. - Set the
templateIdto equalcons!TS_TEXT_DOCUSIGN_TEMPLATE_ID. This is outlined inConstants. - We only have a single
templateRoleso you’ll need to set the value oftemplateRoleListin the expression editor to be equal to our process variable.
- Save and Publish your process. It should look like the image below.

Handle Envelope Complete
In this process model we will handle the event that DocuSign sends when an envelope is completed (i.e., all documents are signed).
- Create a new process model, providing an appropriate name and description.
- Adjust your alert settings to notify the proper user group(s)
- Create a new process variable called
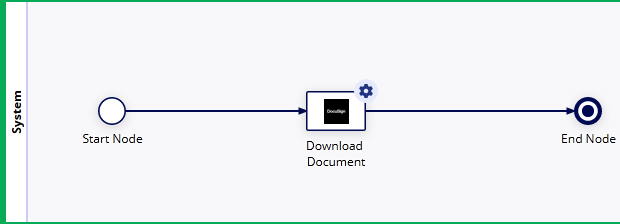
bodyof typeMap. This allows us to take an unshaped set of data that DocuSign provides and parse theenvelopeId. - Create a Call Integration node pointing to
TD_downloadDocumentFromEnvelope- Set the
envelopeIdtopv!body.data.envelopeId - Set
documentIdto1. Note that we can do this because we know there is only 1 document we are signing and the only one we want back is the signed document. This will not be the case in every implementation. - Set
foldertoTS_FLDR_COMPLETED_DOCUSIGN_DOCUMENTS(as outlined in Constants)
- Set the
- Save and Publish your process. It should look like the image below.
Web API
Our Web API will be used to receive notifications from DocuSign for the events we indicate in our envelope.
- Create a new Web API
- Select
Create from scratch - Add an appropriate Name and Description
- Select
POSTas the HTTP Method - Set an appropriate Endpoint value (e.g.,
docusign-event) - Click
CREATE - Confirm the security settings look good and click
SAVE - Set the expression equal to the code below.
a!localVariables(
   local!body: a!fromJson(http!request.body),
      a!match(
      value: local!body.event,
      equals: "envelope-completed",
      then: a!startProcess(
         processModel: cons!TS_PM_HANDLE_DOCUSIGN_EVENT_ENVELOPE_COMPLETED,
         processParameters: { body: local!body },
         onSuccess: a!httpResponse(statusCode: 200),
         onError: a!httpResponse(statusCode: 500)
      ),
      default: a!httpResponse(statusCode: 200)
   )
)
Constants
Ensure the following constants have been created for your application.
| Name | Type | Array | Value |
|---|---|---|---|
TS_TEXT_DOCUSIGN_TEMPLATE_ID | Text | - | The Template ID you copied above |
TS_TEXT_DOCUSIGN_ROLE_SIGNER | Text | - | signer (The role you created in your DocuSign Template above) |
TS_TEXT_DOCUSIGN_EVENT_ENDPOINT | Text | - | The URL of your Web API |
TS_PM_HANDLE_DOCUSIGN_EVENT_ENVELOPE_COMPLETED | Process Model | - | The process model you created to handle your DocuSign Envelope Completed events |
TS_FLDR_COMPLETED_DOCUSIGN_DOCUMENTS | Folder | - | The folder you created to store completed documents |
Sending the Document
Now that everything has been tied together, let’s try it out.
- Start your Create and Send Document process (you can use Start Process for Debugging). This should successfully call DocuSign.
- Check your email for a message from DocuSign with a link to sign your document. Click through to the signing link.
- Click to sign your document in DocuSign.
- Click Finish.
- Check the monitoring tab of your Appian instance for a completed instance of your Handle Envelope Complete process.
- Once you see it complete successfully, check your Completed Documents Folder. You should see a signed PDF inside that looks like the document below.
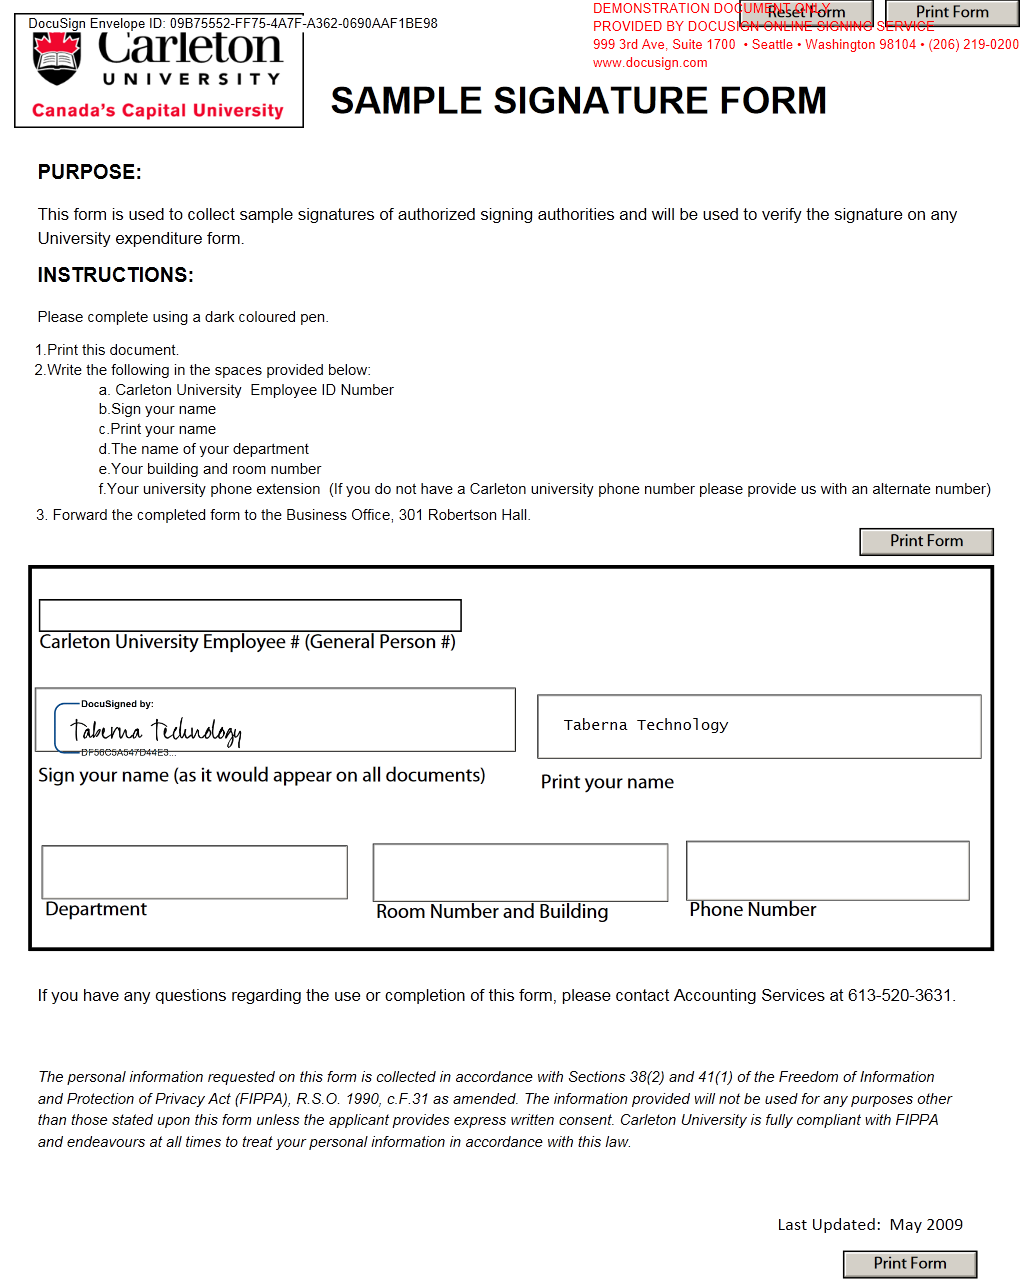 As you can see, we’ve successfully added a signature and the signatory’s name.
What We Didn’t Cover
DocuSign has a vast number of features and we have only scratched the smallest of surfaces here, to provide you with a good foundation for the remainder of your DocuSign implementations. Most notably, we didn’t touch on any of the following topics, but the objects we have created allow for all of them with only small enhancements.
- Multiple signers
- Documents can be signed by more than one signatory in any combination of signing orders.
- Signer authentication
- Signers can be authenticated in a number of ways, including SMS and a provided access code.
- Embedded signing
- You can embed the DocuSign signing ceremony within your Appian application to gather signatures as part of your business workflow.
- Composite templates
- You can combine your standard DocuSign templates with dynamically created Appian documents in one envelope.
- Error handling
- We have not handled any integration errors in this demo. This is not best practice and any production application should contain a robust error handling framework.
- Other roles
- Some document signing flows involve roles where users won’t be signing the documents but must view or receive the envelope.
- Other events
- DocuSign users can decline signing, envelopes can be voided, and we can add a number of other nice-to-have events. We didn’t touch on any of these topics but a robust production application should at the very least handle the event where a recipient declines to sign.
Conclusion
We’ve now set up a straightforward signing flow from Appian to DocuSign. Our pattern is extensible and you can easily expand it to include multiple signers, multiple documents, or even multiple roles.
Do you need help implementing your document signing flow? Do you have any questions on how to implement any of the feature we didn’t cover? Don’t hesitate to reach out to us. We’d love to work with you!